Else Tag Tutorial
The Else Tag, like the If Tag, allows you to display conditional information in your report.
The Else Tag, like the If Tag, allows you to display conditional information in your report. As you can see from the if tag tutorial, if the data retrieved via an <if> tag doesn't meet the condition in the template, the report displays nothing.
But with the <else> tag, if the data retrieved doesn't meet the condition, you can tell Blueprint to display something else.
Keep in mind that an <else> tag is optional, and it is based on an <if> tag. You can have an <if> tag without an <else> tag, but you can't have an <else> tag without an <if> tag.
Step 1 - Create the Else Tag
Click the last cell just after the word "PROMOTION" and click the Tag Builder icon in AutoTag. In the Tags tab, click the <else> tag icon, and click the Save Tag icon. Your table now looks like this:
EmployeeID | LastName | FirstName | Title |
<Employees><EmployeeID> | <LastName> | <FirstName> | <Title = 'Sales Representative'>PROMOTION<else> :if> |
:forEach>
Step 2 - Enter the Text to be Displayed
Now that the formatting of the <else> tag has been taken care of, you can enter the text you want displayed. Click the last cell immediately after the closing angle bracket for the <else> tag and type the phrase "sorry, no raise":
EmployeeID | LastName | FirstName | Title |
<Employees><EmployeeID> | <LastName> | <FirstName> | <Title = 'Sales Representative'>PROMOTION<else>Sorry, no raise :if> |
:forEach>
Step 3 - Run the Report
You don't need to close the <else> tag, because the <endif> tag acts as its closing tag. Save your Blueprint using Word's Save command. Then, from the AutoTag Run Report group, click the desired report format icon. In this example, we chose to view the report as a DOCX file, and this is the result:
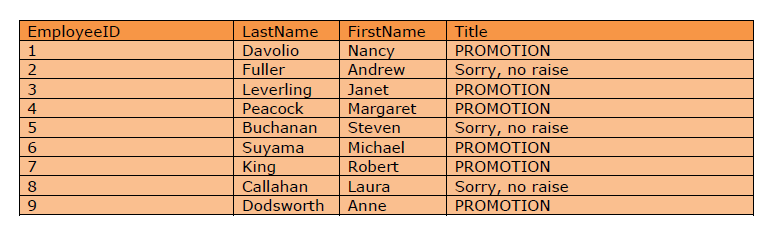
That's it! You've learned how to create <if> and <else> tags.
How did we do?
Else Tag
ForEach Tag